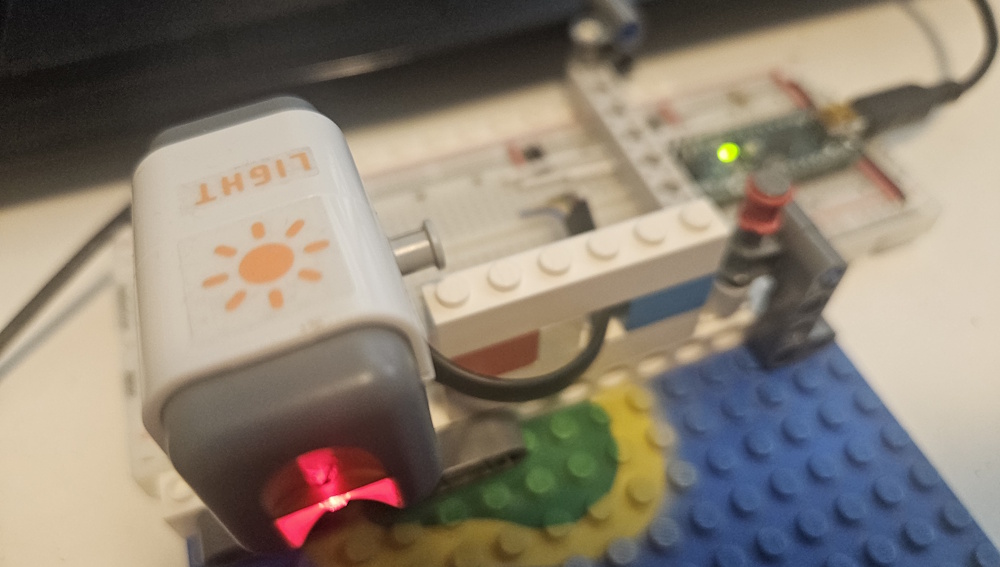
LEGO Robotics microcontroller control - NXT light sensor
Introduction
Having sucessfully interfaced the simplest NXT sensor, the touch sensor in the first part of the series, and worked a bit on the software in the second part, we’ll continue with the next of the basic sensors, the light sensor today.
The light sensor
Looking at the circuit diagram for the light sensor, we see that it uses a SHF309-4 NPN phototransistor for the light sensing. It also have a red LED connected to pin 5 that can be turned on by setting this pin to high(5V).
From raw voltage to light percentage
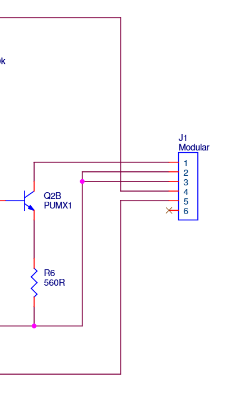
Looking at the output stage, we see that we have a PUMX1 NPN transistor and a 560 ohm reistor connected between pins 1 and 2/3 (GND). We still have the 10k pull-up resistor connected to pin 1 on the microcontroller side, so a bright light shining on the sensor will lead to a low voltage on the ADC on pin 1, as the transistor will be in saturation, while no light will lead to ~5V, as the transitor will not conduct between collector and emitter if there is no light, and pin 1 will be pulled up to 5V.
Instead of using a raw voltage, we want to have a more useful number to use in our projects, like a light percentage, where 100% means the transistor is in saturation, and 0% meaning the transistor is not conducting. To get the corresponding voltage values for, we have to to some calculations, with the large caveat that I am an amateur when it comes to electronics, so my way of calculating this may be wrong.
When the transistor is in saturation, the 10k pull-up resistor and the 560 ohm resistor in the sensor will make a voltage divider. If we ignore the transistor voltage drop for now, we see that this would give an voltage of 265mV, using the following calculation:
\[V_{out} = \frac{5V \times 560\Omega}{10k\Omega + 560\Omega} = 265mV\]But we also have to take into account the voltage drop of the transistor, so we look at the datasheet of the PUMX1, where we find the following table:
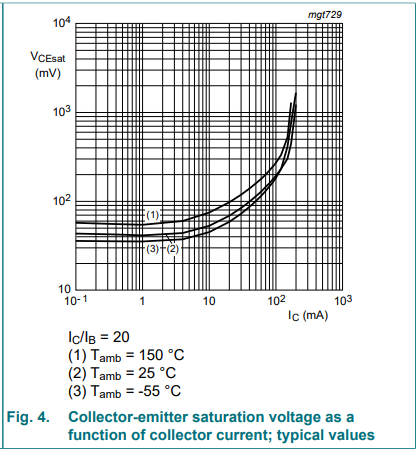
From the table we see that the saturation voltage is dependant on the current through the transistor. We know the voltage (5V), and the resistance (10.65k), so we can use ohm’s law, and see that the max current will be ~ 0.47mA:
\[I = \frac{5V}{10.65k\Omega} \approx 0.47mA\]We can then look up in the table, and see that we get a collector-emitter saturation voltage of 40mV
\[V_{CEsat} = 40mV\]We then finally have our voltage with full saturation, 265mV + 40mV, and can calculate the value on the ADC for max light, ~62. For no light, we use 1023.
\[\frac{305mV}{5V/1023} \approx 62\]Software
Having calculated the ADC values, we can start on the software. For now, we’ll just start simple.
First we have a setLightSensor() that sets the sensor type and optionally lights the led:
void MovingBricks_::setLightSensor(bool enableLED) {
    sensorType = MBSensorType::NXT_LIGHT;
    lightSensorLEDLit = enableLED;
    pinMode(MS_INPUT_PIN_5, OUTPUT);
    digitalWrite(MS_INPUT_PIN_5, lightSensorLEDLit? HIGH : LOW);
}
Then we have enableLightSensorLED() that enables or disables the red LED on the sensor:
void MovingBricks_::enableLightSensorLED(bool enable) {
    lightSensorLEDLit = enable;
    digitalWrite(MS_INPUT_PIN_5, lightSensorLEDLit? HIGH : LOW);
}
Finally, we have getLightSensorValue() that reads from the light sensor and returns an integer between 0 and 100
int MovingBricks_::getLightSensorValue() {
    int analogValue = analogRead(MS_INPUT_PIN_1);
    // Map analog value (0 at 100% light, 1023 at 0% light) to percentage (0-100)
    // Clamp to ensure valid range
    if (analogValue < lightSensorMinAnalog) analogValue = lightSensorMinAnalog;
    if (analogValue > lightSensorMaxAnalog) analogValue = lightSensorMaxAnalog;
    // Cast lightSensorMaxAnalog - analogValue to prevent integer overflow
    // if this value is above 655
    int percentage = ((long)(lightSensorMaxAnalog - analogValue) * 100) / (lightSensorMaxAnalog - lightSensorMinAnalog);
    return percentage;
}
Next post
For the next post in the series, we will implement the last of the NXT basic sensors, the sound sensor.
Source code
The source code for this post can be found at GitHub: https://github.com/vegardw/lego-robotics-control/tree/v0.3
Resources and references
- LEGO Mindstorms NXT Hardware Developer Kit - The Mindstorms NXT HDK
- PUMX1 datasheet - Datasheet of the PUMX1 NPN transistor.